
How to Remove Carpet and Glue from a Pontoon Boat the Easy Way!
By: PontoonPedia.com
One of the more common projects undertaken by pontooners is removing the old carpet. Perhaps you want to replace it with a new carpet, or want to switch it out, either way, it’s tough job and can be very labor-intensive, not to mention the annoying glue residue and marks that can be left on the deck.
The reason I decided to write this guide on removing carpet from a pontoon boat, as well as the actual glue (which can cause massive issues) is because I received a few questions over the last few months, including:
“Hi Bill, what can I use to get the carpet glue to come loose from the wooden floor of my pontoon deck? Some of the carpet won’t come up and is stuck on fast.”
“Do you have any tricks or tips for getting the old carpet and glue off my pontoon? I’ve taken everything completely off the deck and am struggling to get the carpet removed”
“What is the best way to remove old glued on original carpeting from a pontoon boat? I am completely re-doing my 1996 Crest II and I am already worried about this part of the project.”
“I have 1999 party barge with an aluminum floor. How to remove boat carpet from the aluminum floor is my challenge. The carpet is pretty bad.”
With those questions in mind, I am going to address removing glue and carpet from a wooden pontoon floor, and an aluminum floor, so read on to find out how you do it, what you need, hacks and tips, and also advice from other pontooners that I trust.
I use a craft knife or Stanley knife to do this, which I assume you will already have in your tool box. Press the blade into the carpet and start to draw lines up and down the carpet to create the strips that you are going to pull up.
This will be so much easier than trying to pull up the carpet in one go and will also mean it’s easier to get the carpet off the deck, and in theory should lead to less ripping which can leave nasty glue marks on the floor.
What Tools You Will Need
Gloves to stop blisters
Stanley knife or craft knife
Vibrating multitool with oscillating blade
Random orbit sander tool
Goo Gone adhesive glue remover
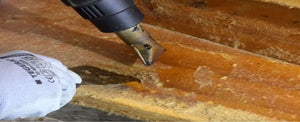
Heat gun tool
How to Remove Carpet from a Pontoon
Step 1: Cut the Pontoon Carpet into Smaller Strips
To prepare for the removal, firstly cut the rug and carpet up into 6 to 8-inch strips. This will mean it will be far easier to pull up, even if stuck on fast with glue.
Step 2: Pull the Carpet Strips Up
You now need to pull the carpet up, and with my boat I used my knife to get a little leverage under each strip before pulling up slowly. I do advise you pull as slowly as you can, as this will help you to reduce the amount of ripped carpet and fibres that can remain on the deck floor – but you are going to get some remaining, it’s just a fact of life unfortunately.
Please Use a Carpet Scraper Tool
If the carpet strips are still really hard to get up and are stuck on fast, then there is a tool solution which I recommend you use. It’s a vibrating multitool with a scraper blade like this one that you can buy on Amazon.
I use the Rockwell product and swear by it. If you have cut the carpet into strips, then you can use this tool to get underneath a section and then work through the whole of the deck until you have all the carpet removed.
How to Remove Carpet Glue from Your Pontoon
Now to removing the carpet glue and left-over pieces of fiber and carpet that will invariably still be there.
It’s important here to recognise that there are two methods here. You can combine the two, but I am going to start off with my preferred method and why.
Method 1: Use a Floor Sander Tool
To get the remaining glue and torn carpet off the pontoon deck floor, you should use a tool. It will dramatically cut down the effort in time you are going to be spending when compared to a more manual approach which I will come onto in method two.
There are industrial level type tools that will do the job very quickly, but they cost 100s of dollars, although it is possible to rent them.
If instead, you want to do things for yourself cheaply, then I would recommend a floor sander tool. There is one that I recommend and used on my own project which is the Bosch Random Orbit Sander on Amazon – the Bosch brand is great, trust me.
In fact, you could use this floor sander to even remove the whole carpet rather than cutting strips into it using a knife. I imagine that if you use a 30-grit head straight onto the carpet that could work quite well, and then switch over to a 100 to 120 grit head to remove anything left over and leave a smoother finish.
Method 2: Use an Adhesive Glue Remover
If you don’t get the desired results, then you could complement the above method with an adhesive glue remover.
But, before you consider this, let me make things very clear: many of these types of products will soak into the wood, and prevent glue from sticking when you come to putting down new flooring.
You will need to make sure that everything dries out completely before you even consider putting down and gluing new carpet to the deck. If you don’t let it dry, then any new glue probably won’t stick properly – so make sure your wood floor is dry and smooth before laying new carpet on top.
So what product should you use?
It needs to be solvent-based product or you’re probably not going to get all the old remaining glue up. If you pick other solvent-based adhesives that are not meant for marine carpet you will destroy the back of any new carpet you are planning on using.
My choice here would be to buy a couple of bottles of Goo Gone Pro-Power.
You are going to need that much in order to get rid of any stubborn glue marks on your pontoon floor. There’s a YouTube video below which gives a very brief overview on how to do this part.
How to Remove Boat Carpet from Aluminum
Removing boat carpet from aluminum is infinitely easier than doing it from wood so I am not going to do a stepped approach here, as all you need to do is follow the guide above.
It’s essentially the same steps, but you might be able to pull all the carpet off in one piece so try that first before you go to the trouble of cutting strips into the carpet.
You can then use a good sharp scraper and heat gun (here’s one on Amazon). Heat up the carpet, and then start to lift off by hand and with the help of a scraper.
Once you have lifted up as much of the carpet as you can, use a sander or grinder to get rid of any patches of glue. Sand the entire deck area for a smooth surface.
As with wooden flooring, some small fiber pieces could still remain. But just take a while with your grinder or sander and you will soon be able to get it clean and smooth.
Useful FAQs & Potential Issues
Whilst the methods outlined above will work the majority of the time when removing the glue and carpet from your deck, there might be some curve balls you need to be aware of. I have tried to answer those below.
Not Happy with How the Wood Looks or New Glue Not Sticking?
Despite your best efforts, some of the advice given in this guide to removing carpet from a pontoon boat might still leave you with wooden decking that you don’t like the look of.
It also might not give you a smooth surface to work with for the new carpet and glue, or you might find the glue doesn’t stick as well as you want. You have a number of options available to you.
Other boat owners I know have unfastened the old wood and flipped the deck over to use the underside for the top. It gave them a much smoother surface to work with. This was a larger project obviously and did mean that he had to relocate some drill holes and do some re-wiring, but for him it worked well.
For the best results, I would recommend buying new wood as you can never truly completely dry wood out. If you remove the old wood, and install new wood, your carpet or vinyl will stay down longer. Older wood can retain moisture which will possibly affect how well the new glue works.
Another consideration is that if you are laying vinyl down onto existing wood where you have stripped carpet and glue off, then vinyl can show up any imperfections. Which is another good reason for replacing the wood completely.
What If You Have Flat-Headed Through Bolts?
Some pontoon boat carpet will have flat-headed through bolts which secure the carpet to the deck. These can be very hard to get out, but you can do it.
There’s a great online guide which I recommend you take a look at which will give you a stepped process on how to remove flat-headed screws and bolts. You can read that on the Craftsman Blog.
What Products Not to Use to Remove Carpet Glue
Whilst looking into this topic, I hopped onto a lot of boating forums to see what other owners are recommending for removing glue from their deck. One tip that commonly popped up was to use something called MEK (also known as methyl ethyl ketone and butanone).
It will work, but it’s an extremely hazardous cancer-causing agent. I would never use that on a pontoon boat as it will soak into the wood and you will never get it out. My kids will never sit there if it had been used.
So, if you do hear or read this advice online, please ignore it completely!
Comments from Boat Owners
To supplement this pontoon carpet removal guide, I also spoke to other boat owners to see how their experience went after taking my advice, or with previous projects that they have done. Here’s a selection of those comments.
“I don’t know how we got so lucky, but our glue was pretty much gone. The carpet pulled right up really quick like you said it would. But I think the previous owner had used a water-based glue, so it was gone with no need to remove it. We just replaced our carpet and it looks great. The worst part for us was taking everything apart and unwiring.”
“I have a red neck solution to removing your carpet which I used last year. Get a section loose and lifted up, hook it into a tow rope, and the pull it clearly off with your truck, but make sure you go slowly! It left loads of rips, and next time I will be using your guide.”
“To remove carpet glue, I’ve used denatured alcohol which worked okay after sitting for a few minutes, then tried carb cleaner which worked a little better. I then I tried a heat gun (on a dry separate area of course) and that seemed to work the best, but certainly not as well as the guide above.”
“I genuinely recommend that people just remove the plywood and start over with new wooden flooring. If you change the decking you won’t regret it for the money, but it is a larger job admittedly”
“I’ve done it also. The floor sander is the only way to go. It will do a good job. But definitely wear gloves as you can get terrible blisters after an hour or so of working on the carpet removal.”
I use a very different approach to pulling the carpet up. All you do is fit a paddle attachment to the end of your drill, get one of the edges of the carpet up, and then try to get a piece of the carpet caught up in the drill bit before pulling up.”
Conclusion
I hope this guide has helped you in cleaning up and removing the glue and carpet from the floor of your pontoon boat. As with all guides on Pontoonopedia, I welcome any feedback from other boat owners who might disagree, want to contribute, or just say thanks. You can do that via the usual channels.
For all your accessories and/or vinyl flooring visit Pontoon Depot's shop site.
- Amy Cabanas
- Tags: Boating DIY DIY Boat maintenance Pontoon Accessories pontoon boat pontoon boat Refurbishing tips

The Complete Guide to Pontoon Sea Legs
By: BetterBoat.com
What are pontoon sea legs?
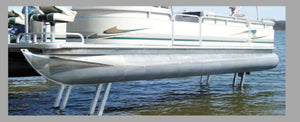
Sea legs are basically two portable hydraulic mechanisms that attach to a pontoon boat’s underside, which can lift the boat approximately six feet above water when activated. Even out in the middle of the lake! When you’re ready to head home, you just lower it back down.
Unlike traditional boat lifts or storage systems you normally see on docks, they’re an excellent alternative for pontooners. Because as you’ll soon learn, pontoon sea legs go wherever you and your boat goes.
And you might not even need a boat trailer to haul your pontoon to storage, either.
How Pontoon Sea Legs Work
Attached to the bottom of your pontoon, sea legs are powered by a battery, which lifts the boat up out of the water to a holding position.
Tucked hidden away and installed under a seat compartment, the sea legs’ hydraulic system is activated by a one-horsepower, 12-volt pump.
To work properly, they require at least a 750 cold cranking amp battery, similar to this Optima Deep Cycle Marine (check price on Amazon).
Strong Pontoon Sea Legs Materials
Sea legs are typically constructed of lightweight extruded aluminum alloy tubing, set at an angle to provide the strength for a heavy pontoon boat. The aluminum isn’t bad for erosion prevention, either. At the end of each sea leg is a 48” x 18” pad foot, which supports the structure along the lake bottom.
The four hydraulic cylinders themselves are supported by steel alloy piston rods, which support approximately 6,500 pounds of lift capacity, which should support most heavier pontoons.
Pontoon Sea Leg Manufacturers
Sea legs are currently manufactured by two reputable Minnesota companies. Here’s a brief introduction to each:
Hewitt
Hewitt offers different models for pontoons. One model has a wide base to offer better stability in wind and rough water. But there are also electric and hydraulic sea legversions.
Sea-Legs
Sea-Legs, the brand, has sold more than 10,000 sets throughout the U.S. and Canada. Their product offers 3,000 pounds of extracting and retracting power to keep from getting stuck. This is great if your lake’s sediment has sand, rock and mucky areas that could get the legs stuck.
The Cost of Pontoon Sea Legs
The cost to place sea legs on a pontoon can vary, depending on which brand you go with. But here is a general breakdown:
For a two-tube pontoon boat, sea legs cost approximately $4,300. And that’s just the legs.
Installation cost an additional $700, totaling $5,000.
For a tritoon pontoon boat, sea legs are approximately $6500, plus $1000 for installation, totaling $7500.
If you want the average 26-foot lift canopy, expect to pay around $4500, which doesn’t include setup or installation.
And then there’s the bells and whistles! Want a remote control for your pontoon sea legs? It’ll cost around $300 to $400.
The warranty — With your sea legs, you will find a warranty. But they may be different and vary anywhere from a one-year to two-year warranty. Ask your dealer about specific details of your warranty and read the fine print! Once installed, improper use of your sea legs can void the warranty.
Pontoon Sea Legs vs. Traditional Hydraulic Lifts
Sea legs are different from your traditional hydraulic lifts. The most obvious difference is that sea legs are installed to the bottom of your pontoon. Traditional hydraulic lifts, however, are installed onto docks and within storage facilities.
If you’re considering buying either sea legs or hydraulic lifts, consider their additional advantages and disadvantages:
Advantages of Sea Legs Over Lifts
- Prevents having to haul your boat to docks/lifts
- Prevents a pontoon from banging against the dock
- Activated by the convenient push of a button
- Protects pontoon tubes from algae and mold buildup
- Deployed anywhere easily without cables and pulleys
- Install works on most pontoons
- Drifting is prevented and without anchors
Disadvantages of Sea Legs Over Lifts
- Affects your pontoon’s performance and towing capacity, as they add ~350 pounds
- Only fits pontoons between 18 and 30 feet
- Pontoon weight affects sea legs. (For maximum performance, the weight cannot exceed 5,800 pounds
- Sea legs are not on the cheap side
Alternatives to Sea Legs and Lifts
Sea legs aren’t a good fit for all pontoon owners. One major issue is the cost. If you prefer not to spend money on sea legs, lifts or even a dock, you can always go with economical ways to protect and secure your boat.
You have a couple of options:
1) Secure your boat to a dock or deck — For starters, learn some of those handy, Houdini-esque nautical knots.
The downside? This method won’t protect pontoons from mold/algae. It may not prevent damage from banging the dock’s side either. If you go this route, make sure you have a good pontoon cover to protect your boat.
To be fair, you’ll probably want to cover your pontoon when using sea legs, too. It’ll still be exposed to the elements, so a good cover is a good idea, like this Pyle UV protective cover(check price on Amazon) that’s mildew resistant and waterproof.
2) Use a trailer — Load your boat up onto your trailer and haul it to and from the water.
When you can’t currently afford sea legs or own your own dock, these are great options! Sea legs are expensive. So are docks. They don’t always fit our budgets … and some folks are simply more budget-conscious.
How Many Sea Legs Your Pontoon Needs
Your sea leg quantity depends on your pontoon’s overall size in terms of length and weight. Keep in mind, however, if your pontoon’s longer than 30 feet or shorter than 18 feet, it may not be suitable for sea legs at all.
In most cases, however, a pair of sea legs is installed toward each end of the boat. Longer pontoons, obviously, may require more. Check with your dealer and installer to help determine what your pontoon make and model needs.
Sea Leg Safety and Stability
Reports of pontoons tipping over while on sea legs are out there. But don’t let that scare you away. You just have to use them in the right conditions.
Muddy underwater sediment and even high wind affect a sea leg’s stability, so double-check these possible conditions before installing.
They can’t be used in water with rocky bottoms, either. It reduces the safety and stability of the sea legs.
Laws and Permits for Sea Legs
Although sea legs have supported pontoons since 1996, they’re still an up and coming trend and growing steadily.
Check with your state and local authorities to inquire exactly what permits are needed. It’s possible sea legs may not even be permitted where you live. Avoid spending that much money or having to remove them!
As always, it’s always a good idea to double-check. If you’re uncertain where to start, check with the United States Coast Guard to better understand laws and regulations. If you’re still unsure, request a contact in your local area.
Sea Leg Insurance
You need insurance for practically everything these days. And you’ll need insurance to cover your pontoon sea legs, too. Attached to your pontoon’s bottom, they’re not a permanent structure and may require a different type of insurance.
Check on your pontoon coverage, too, while you’re at it. Your current coverage may change with these additions. And your insurance company may need to know how your boat’s being stored.
If you have questions, you can contact the United Marine Underwriters for guidance.
Conclusion
Pontoon sea legs are a promising alternative to traditional lifts, even though they’re unusual and make your pontoon appear as though it could walk on water.
They might not work for every pontoon owner. But if they do, one thing’s for sure: They’ll not only protect your pontoon, but also be a great conversation piece!
For all your accessories and/or vinyl flooring visit Pontoon Depot's shop site.


Let The MADNESS Sales Begin | Pontoon-Depot
Cyber Monday is around the corner and we are having an amazing sale. You get 10% off your entire purchase. Now how's that for awesome?!As you may know, MariDeck is the industry leader when it comes to flooring for boats. Pontoon-Depot has many different types of MariDeck, for all the various types of applications that you may need for your project. We also have many cool boating accessories, so look around and make sure you take full advantage of this great deal.
The 10% off your purchase is only good on 11/26/2018 [Cyber Monday].
Promo Code: CyberMondaySale
Be on the lookout for more great deals from Pontoon-Depot, so we can help make your time on the water even more enjoyable.
We appreciate your business, as well as your support on social media. Thank you!
Safe Boating My Friends!
Pontoon-Depot

Pontoon Tiny House: Considerations Before Building
By: BetterBoats
Intrigued by owning or building a pontoon tiny house?
They could be your answer to low-cost houseboat living. Sounds awesome, doesn’t it? Especially when you can’t afford bigger liveaboard boats, don’t like the idea of marina living or want something more customized than cheaper boat living options.
With the tiny house trend on the upswing, growing interest is spreading across the world. (Check out this pontoon tiny home video.) While they seem practical and break the cuteness scale, there’s a lot to consider before investing in one. So let’s weigh your options.
What’s a Pontoon Tiny House?
Pontoon tiny houses are custom homes designed to fit onto a pontoon base (tubes). You can enjoy all the comforts of home on the water, without the huge cost (and labor) of owning an enormous houseboat.
You can buy one pre-built or have one custom designed, which all depends on your budget, desired size and how you plan to use it.
Investing in a Pontoon Tiny House
You love this idea, and I’m right there with you! But, like me, you still have questions: Is it safe? Are there special rules and regulations involved?
And then there’s the biggest question of all: How much will it cost?
This guide can help you with all that. You can read on to find information on state law and permit guidelines, types of tiny houses to consider, costs, transportation, and more.
If you’re as intrigued as I am (mine’s already built in my head!), read this guide to get answers and maybe even get started.
Types of Pontoon Tiny Houses
How do you plan to use your pontoon tiny house? Will it be solely for recreational and entertaining purposes, or do you plan to use it for extended fishing trips? Or both? Either way, there are a few considerations to think about.
Pontoon Tiny Houses for Leisure
If you plan to use it for leisure and fun, consider these optional accessories and features:
- An ample deck for lounge chairs, tables, umbrellas, and accessories (think coolers and grills)
- Extra storage (for those fun accessories above!)
- A portable/hidden clothesline for drying clothes and towels
- Or you can go big and install a stacked washer and dryer, like this Kenmore 1.6 unit(check price on Amazon)
- Ample windows for lots of light
Pontoon Tiny Houses for Fishing
If you plan to use your pontoon tiny house for fishing, there are various pontoon fishing accessories. Some of which may take pre-planning and/or installation during the building process. Consider these accessories and features for a tiny house built for fishing:
- Large deck for fishing chairs, accessories and equipment
- Ask your builder/dealer about installing a trolling motor, like this Newport Vessels brand (check price on Amazon)
- Install a live baitwell or cleaning station, like this Keepalive Tank with aerator(check price on Amazon)
- Specially-installed railing for fishing rod holders
- Downrigger for trolling, like this Cannon Manual Downrigger (check price on Amazon) that comes in six types and sizes
For a better idea, look at these series of custom pontoon tiny homes by, Le Koroc, which come in two designs: Fishing Series and Holiday Series.
Additional Pontoon Tiny House Features and Ideas
Interested in a kit? Check out these clever pontoon tiny house kits and ideas.
Solar power is another option to consider: Check out this solar-powered pontoon tiny houseboat. It’s awesome!
All these options are features you might wanna think about, depending on your needs and plans. But you absolutely need to plan ahead to avoid later regrets.
Building and Customizing Pontoon Tiny Houses
Once you decide how you intend to use your pontoon tiny house and have chosen some of the features mentioned above, you’ll next need to consider these basic underlying features.
Will you float in freshwater or saltwater? Will the house be used year-round or only in summers? These are important considerations before building or buying.
Saltwater vs. Freshwater Materials
Water types are an important consideration.
Plan to sail your pontoon tiny house in oceans? Make sure it’s saltwater worthy. This includes all hardware, electrical connections, plumbing, and even motors, which can all be affected by saltwater brine. Since saltwater causes erosion, you need to ensure your pontoon tiny house is saltwater worthy throughout. To do so, here are a few must-haves:
Use maritime paint and maybe corrugated steel roofing (check price on Amazon) to withstand the elements.
You can even install solar panels for the roof (if there’s room in your budget). Yes, these cost more up front, but save you money in the long-run. Not to mention, it’s these small investments that help protect your bigger investment.
Discuss this with your builder or dealer. Before making the final payment, or signing any final documents, consider having your new tiny house inspected to be certain it’s saltwater worthy. This is crucial if you’re sailing year-round. Your boathouse baby will be exposed to the elements for longer periods, so plan ahead for this to avoid later problems.
How to Choose the Right Pontoon Base
Your pontoon base and tubes will be determined by your pontoon tiny house’s weight and length.
It will also be determined by your budget. Can you afford new tubes or used tubes?
Consider a used pontoon tubes age and condition. Older tubes need to be thoroughly inspected for holes, dents and drainage problems. Generally, also, how it currently floats.
If it fails the test in any of these areas, it’s a major safety issue. This is when you should consider buying new bases for better safety and security. (Not to mention the investment in the house you might’ve already built!)
How Many Tubes?
Two tube or three tube pontoon?
Ask your builder or dealer to determine this. An assessment of your needs, along with the house size and weight, can help the builder/dealer make this call.
And here’s a pre-fab float system to consider: Look at this Pontoonz Modular Float System, created in New Zealand. This is an innovative option you may wanna think about. (For cost, you’ll need to contact the dealer.)
Attaching Your Tiny House to Pontoon Tubes
One overlooked cost is the cost of setting your new pontoon tiny house onto its new base.
Locate someone local who can do it and is willing to do it. But make sure to:
1) Get a quote
2) Ask for proof of insurance
Avoid working with someone who isn’t familiar with this procedure. And especially avoid someone without proper insurance to cover your boat, just in case.
Find a reputable company or individual. It’s worth the hassle to be worry-free and you’ll sleep better, too!
Legal Questions and Guidelines
State Laws and Permits
Just like regular boating, houseboat laws and permits vary from state-to-state. Even in each country.
Certain bodies of water, such as lakes and reservoirs, frown upon houseboat living, regardless of it being a pontoon tiny house. Although smaller than some yacht-like houseboats, they’re still considered houses in the eyes of the law. So restrictions vary.
Before building or buying, check with governing state authorities to verify precisely what’s allowed and what permits are needed. If you can’t have your tiny pontoon houseboat in the closest, most-convenient waters, it may not be worth pursuing.
To check your local laws, here are two places to start:
- U.S. Army Corps of Engineers — information on regulatory permits, and more, for each state.
- United States Coast Guard (USCG) — helpful information for each state.
Check these sites for your state information, then check with the governing offices to ask any additional questions.
Insurance Costs
Houseboat insurance, big and small, varies from state to state. (Not to mention from agency to agency.) But, you’re required to buy it.
Your costs will be determined by many factors, like size and investment.
If you’re unsure who to contact for insurance quotes, check with the United Marine Underwriters for advice.
Additional Building Costs
If you’re handy with DIY projects, build a pontoon tiny house yourself. It may help protect your wallet.
But whether you plan to hire a builder, buy a custom-designed tiny home or use a kit, there are additional costs to consider.
When planning a budget, you need to determine costs for many areas, not just basics.
As with any newly-built house, you’ll have these initial building costs: Foundation, walls, flooring, roof, heating and air. (These costs can vary greatly depending on what you choose.)
Then you’ll need to purchase appliances, such as sinks, a shower and a toilet.
And then there’s decorating: Paint, cabinets, hardware and mirrors.
You’ll need special furniture: Hidden bed/storage beds, chairs with storage and folding tables.
Then there are annual costs: Yearly maintenance, as well as fees, permits and storage costs.
Oh, and then there’s this…
Transporting Your Tiny House
You new tiny boathouse will need to be transported, whether it’s on the base yet or not. You’ll have to transport it to the base to be attached, and you’ll have to transport it to its final destination. (Geez… so much to think about!)
So, like I said before, locate a reputable company who can transport it for you, including a transportation quote and proof of insurance.
Then, you’ll need to transport it to either a storage facility, dock or it’s base to be attached.
And it’s best to keep that transport company in your contact list to transport your pontoon tiny house to a service provider for maintenance or repairs. (Hopefully not, but it’s best to plan.)
Transportation costs and fees can all add up, so get quotes first to include in your budget.
Inspecting Your Pontoon Tiny House
Just chock it up. You may not want to pay those few final inspection costs, but it could protect your investment. And even protect lives.
First Inspection
When having a tiny house built, you’ll need it inspected for proper building codes, laws and permits—just like a regular house. Don’t forget about saltwater compliance inspections, as I mentioned earlier. If you’re not doing the building yourself (or hiring it out), ask your dealer about the final inspections. Are they included? Who’s responsible for handling it?
Check the fine print in your contract. Once your tiny house leaves the dealer, you may have no recourse if proper codes haven’t been met.
Second Inspection
Before transporting your tiny house, have it inspected to make sure it’s properly attached to the bases/tubes. If it isn’t, it can become damaged during transit. And you sure don’t want any problems on the water.
Inspecting Each Phase
A smart option is to pay licensed inspectors for each building phase up until the point of base attachment. Safety is never worth saving just a few pennies.
Storing Your Pontoon Tiny House
You might need tiny house storage, either temporarily or in the winter. So start your search to locate a storage facility who can (and will) safely store it.
Most likely, they’ll need the weight and size before providing a quote. Once you get a quote, ask for proof of insurance. (Yep. I’m a broken record, but you can’t forget!)
If you can’t locate a viable storage facility close by, you’ll need to consider transportation costs to a neighboring city for storage.
This is a big deal, because safe, secure storage can protect your investment and give you peace of mind.
Pontoon Tiny House Ownership
This is an awful lot to consider before building, or buying, a pontoon tiny house. But when you consider that it’s truly a house (even though it floats), there are many costs and considerations to think about.
Who knows? Thorough planning, research and a simple financial plan can guide you on your way to tiny houseboat living on your pontoon.
Won’t that all be worth it?